Showing posts with label DIY. Show all posts

Monday, March 25, 2013

A simple belt rack/accessory organizer DIY!

Today I have a super easy and really cheap DIY project to share with you guys! I'm most likely not the only girl out there with way too many accessories on her hands. My belts were in a jumbled up pile in a vintage suitcase, and my necklaces were tangled and there were head scarves everywhere! It was time for a change. Time to organize...something I am a pretty huge fan of to tell you the truth. So I looked around my home and tried to figure out how to hang everything nicely, and then I saw a piece of pegboard in one of my closets and thought it would be just perfect for the job. 

This is a really affordable project and it took almost no time at all! 
All you need is a piece of pegboard in the size of your choice. Most hardware stores will be able to cut them down to the size you need. Mine is 2 feet wide and 4 feet tall (I measured my longest belt and allowed for extra room at the bottom). Once you have your pegboard cut, simply go on over to the hardware section and look for nuts & bolts. I tested out a few until they fit perfectly in the pegboard holes. A little tip-wear a belt to the hardware store, or bring one with you so that you can make sure the bolt head is not too big to fit your belt over. Now count out however many belts/accessories you want to use and that number will be how many bolts you buy. Double that number of nuts and you are good to go! All you need now is paint, a paintbrush or sponge and the nail polish color of your choice.

Ok, first things first, paint the pegboard and give it two coats if it's not covering well.
While the paint is drying, screw the bolts onto the nuts as far as they can go. 

After the painted pegboard has dried,  stand it up and place the bolts where you want them to be to hold up your accessories. I played around with mine for awhile until it looked just the way I like it. Then I screwed the second nut onto the other side of the pegboard and onto each bolt securing them in place. All you do next is paint the heads of the bolts with nail polish  Normally I would spray paint them but I didn't have time so nail polish would have to do the trick, and it did! It worked just perfectly, and everybody has extra nail polish kicking around!

Once that dries, all you have to do is fill up your new accessory board! So simple right?

I hope you like this simple organization tip! Happy accessorizing!
Xo, Erin

Wednesday, March 6, 2013

A little bedroom makeover.

I recently gave my bedroom a mini makeover (or make-under, I suppose.) A few years ago I had painted all of the walls bright turquoise, which I totally loved at the time but after awhile all of the bold walls started to feel a bit overwhelming. (I should also mention that we don't have a particularly large bedroom... there is basically just enough room for our bed and one dresser, that's it.) So we decided to simplify and clean things up a bit with a fresh coat of warm white paint on all of the walls and seriously what a difference! It's like a breath of fresh air! The room is so much brighter and also seems a lot bigger, which is always a bonus! Now just because we opted for an absence of color, doesn't mean that the room is super monotone. We added tons of pretty color by making the bed with an assortment of retro floral pillowcases and pops of green were added throughout with cute potted plants. I also feel that the simplicity of the walls is better for showcasing my mid century lamps and fun kitschy art.

Overall, we are super pleased with our decision to streamline and simplify. The space seems a lot more inviting and it is so cozy in the soft evening light. Here are a few peeks at some details around our new and improved bedroom:
It's amazing what a difference a simple project like painting a few walls makes! Do you have any fun projects on the go right now?

XO, Stef

Tuesday, February 26, 2013

How to make the perfect cheeseboard.

For as long as I can remember I have had an immense love of cheese. Everyone that knows me, knows that the key to my heart is with cheese. In fact, on numerous birthdays friends and family have surprised me with cakes made entirely out of cheese (no, not a cheesecake but a cake of cheese.) I have made countless cheeseboards over the years to serve at dinner parties and I thought it might be fun to share some tips with you today on how to make the perfect cheeseboard:

First of all, you should chose a variety of different types of cheese. A well-balanced cheeseboard has one of each of the following categories: fresh, soft, semi-soft, hard, and blue. There are many examples of each type of cheese, but here are a few basics to get you started:

Fresh: feta, ricotta, mozzarella, mascarpone
Soft: brie, camembert, capricorn goat
Semi-soft: edam, havarti, taleggio, gouda
Hard: manchego, emmental, grana padano parmesan, aged cheddar
Blue: stilton, roquefort, gorgonzola, cambozola

Once you have decided on the cheeses you would like to serve, your next decision is the accompaniments. Here are a few examples of delicious things you can pair your cheeses with:

Fresh fruits: blackberries, strawberries, grapes, green apples, figs (if they are in season)
Dried fruits and nuts: apricots, cranberries, figs, various mixed nuts
Spreads: chutney, jam, mustard, olive oil & balsamic vinegar
And of course plenty of crackers and crusty french baguette.
(You can also add some cured meats to the plate as well, such as prosciutto and capicollo)

Next, take time to arrange the cheeses in a pleasing way and serve them on your favorite wooden platter or slate board. If you don't have either of those, you could also use a wood or plastic cutting board. Also, don't forget to include a knife or two for guests to help themselves.

*Tip: Take the cheeses out of the refrigerator an hour before you serve them so that they become room temperature. By doing this you are maximizing the flavor potential of the cheeses.*

For my cheeseboard I used: feta (fresh), soeur angele which is a brie made of both cow's and goat's milk (soft), douanier (semi-soft), 4 year aged cheddar (hard), and gorgonzola (blue). For the accompaniments I used fresh figs, dried apricots, green grapes and mixed nuts (and plenty of baguette of course!)

Have fun trying new cheeses and experimenting with different flavor combinations! I hope you enjoy this as much as I do!  XO, Stef


All information taken from the book World Cheese Book by Juliet Harbutt.

Monday, January 21, 2013

Organization idea: Mason jar spices.

There is something about the start of a new year that gets me feeling so motivated. I have finally started tackling those pesky jobs that have been put on the back burner and saved for a rainy (or snowy) day. Well, the snow has been falling and the wind has been howling, so I figured what a perfect time to start organizing my kitchen cupboards! I also decided that each weekend I am going to organize one room in my house and this past weekend I started with my kitchen.

I don't know about your kitchen, but my pantry and cupboards seem to get pretty outta control very quickly. Before I know it I find myself starring at four Cheerios boxes that are all about 1/8 full and a bunch of random ziploc bags of assorted spices that have been purchased with one specific dish in mind and then once that dish is completed they get tossed to the back of the cupboard and totally forgotten about. Well I finally decided that enough is enough! 2013 is going to be the year of organization and more experimenting in the kitchen! So I started by giving my kitchen a complete overhaul. I found a cupboard full of empty mason jars that were taking up precious cupboard space so I decided to use them for spice, nut, seed, and pasta storage! By doing this I freed up so much more cupboard space and now all of my cooking ingredients are so much more accessible.

Another bonus? They look pretty darn cute. Definitely a step up from my stash of random ziploc bags. I hope this kick-starts your week and inspires you to venture into tackling some of your rainy day jobs!
XO, Stef

Monday, January 14, 2013

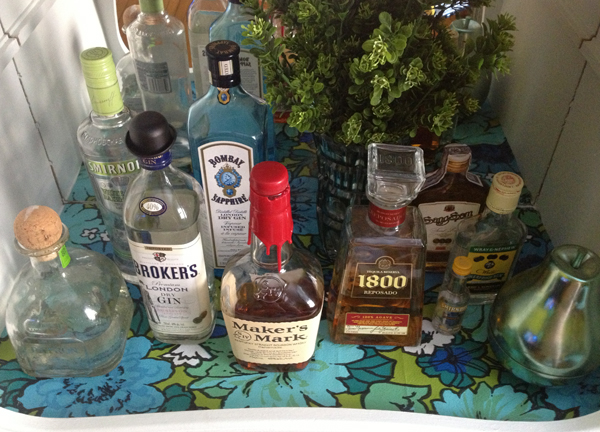
My vintage bar/cabinet makeover!

So I have a good story behind this vintage cabinet. It all started in the Summer when I saw this ad go up on kijiji (Canada's version of Craigslist).
 I instantly fell in love and knew it had to be mine! I immediately picked up the phone and called the number, but unfortunately the guy was just loading it onto someone's truck. It was sold. I don't know why, but I had an urge to put the photo of the bar on pinterest because I had never seen anything like it. A few weeks passed and I got a random email from a woman who lives in Winnipeg and had even been in my shop before! Low and behold, she follows Stef and I on pinterest, saw the pin and had the exact one sitting in her garage that I could buy! My mouth literally dropped to the floor. Seriously, what are the chances? I went and picked it up that same day and it was even cheaper than the first one I fell in love with! I took it home and have loved it ever since. Well, as good as that story is, it gets even better! A few weeks after I took it home I was working at the shop and one of our regular customers who has an incredible collection of 50's and 60's furniture and knick knacks came in and we got to talking and he asked if I had found anything interesting lately. I quickly pulled up the photo on pinterest and his mouth dropped. It had been his ad on kijiji! When I called about it, it was him that I had spoken with! We had a pretty good chuckle about it, and he was so happy that I ended up finding one just like it! On that note, let me show you the cabinet!
So this is what it looked like when I first brought her home. Sorry for the poor photo!

This is what she looks like now! I'm thrilled with the way it turned out!
First I stripped it down, took out the sliding glass doors, sanded the whole thing down and then did one coat of an oil primer. Once that dried I did two coats of white paint. The left door is a little bit crooked, but I like that it doesn't look perfect!
After everything was dried, I measured the inside and cut a piece of vintage floral vinyl I had been saving for just this kind of occasion!

Ta-da! What do you think? Have you done any fun make-overs to something in your home?

Monday, January 7, 2013

2012 in a Nutshell.

Here is a round-up of our favorite posts and highlights from 2012!

JANUARY:
-We celebrated our blog's first birthday! Yay!
-Our vintage boutique Rhymes With Orange also had it's very first press feature! So exciting!

FEBRUARY:
-We shared a cute DIY post on how to make your own scalloped felt iPad case.
-We each gave our tired old dressers a makeover and shared the results in this before & after post.

MARCH:
-We posted a simple tutorial on how to properly set your table with your favorite retro dishes.

APRIL:
-We were lucky enough to go on a month long trip to Thailand, Malyasia, and Bali with our husbands! (photos found here: part 1, 2, 3)
-We also shared a little taste of Thailand with Erin's Tom Yum Soup recipe.

MAY:
-Our little mobile shop got a lot of amazing press in May! We were featured on Conde Nast Traveler as well as the MSN homepage! What an honor!
-We also did a fun spring outfit post with our cute new B.A.I.T. shoes!

JUNE:
-It was Stef's 3 year wedding anniversary in June so in honor of that she shared her 
-We also made a fun DIY retro wood wall art post.

JULY:
-Our favorite thing to do in summer is eat outside so we shared some tips for hosting outdoor dinner parties.
-On Canada Day we had our first event of the season with our trailer, Olive! It was also one of the hottest days of the year!

AUGUST:
-Erin celebrated her 2 year wedding anniversary in August and shared her wedding photos!
-Stef and Emery went on a little summer trip to New Orleans!

SEPTEMBER:
-Come autumn we decided it was time to give our shop a little facelift so we bought an old hutch and gave it a makeover and we had fun creating back-to-school displays in our front window!

OCTOBER:
-In October we finally opened our vintage kiddo's section! We were so glad to finally check that off our to-do list! Erin's sister Megan also took the cutest promo shots for us featuring our friends' cute little ones!
-After our kid's section was officially launched we went back to Thailand for business/holidays and this time we also made a stop over in Tokyo where we got to visit a Cat Cafe!! (which was a major highlight for us!)

NOVEMBER:
-We were so honored when Elsie asked us to feature our home tours on her blog A Beautiful Mess! (You can check out Erin's home here and Stef's home here.)
-We officially opened our new online shop called 'The Lovely Closet' which you can shop here. Our blog also hit a major milestone during November: we reached one million views! Wow, we are still totally blown away by that!

DECEMBER:
-In December Erin celebrated her 28th birthday and Rhymes With Orange celebrated it's first birthday! Wow, can't believe we have successfully been in business for a year already!

*Whew!* What a year! Time sure flies! So curious to see what this year has in store for us...

Happy 2013!
Love, Stef & Erin
XO

Monday, December 17, 2012

'Tis the season to make!

With Christmas just around the corner we thought it would be fun to share some cute holiday DIY ideas that we found on the internet that we are dying to try!
These cute hand dyed mini Christmas trees would make a great addition to your holiday decor!
(DIY tutorial found here.)

We've gotta admit that we become kind of lazy when it comes to trying out different nail tutorials but we definitely want to try out this gorgeous festive manicure idea this holiday season! Have we also mentioned that we are suckers for a little bit of sparkle? 
(nails found here.)

Instead of just using plain old ice cubes at your next holiday party, why not try these delicious looking rosemary and red current filled cubes? 
(recipe found here.)

These DIY fruit pillows would make a great gift for any special little ones in your life! 
(sewing tutorial found here.)
How pretty is this festive candy bark? This would make a great gift idea for your friends!
(recipe found here.)

And last but not least we love this wreath made of vintage christmas ornaments! Such a great way to combine two of our favorite things: vintage + Christmas!
(DIY tutorial found here.)

Happy crafting & baking friends!
Xo

Monday, December 10, 2012

DIY Christmas stocking.

Want to make your very own super easy no-sew stocking? We put together a really simple DIY so that you can make one for your mantle!
What you'll need to make 2 stockings: 
-Half a meter of heavy felt
-Small piece of felt in a different color if you want to jazz it up!
-Hot glue gun

All you do is draw out a basic stocking shape on a piece of the large felt, and then trace a second one. Next cut out a shape for the top of the stocking (we traced half circles using a spool of thread to create a scalloped bottom). Then cut out circles and a small strip for the loop to hang the stocking out of the other color of felt. All you do after you are finished cutting is glue it all together! We started by glueing the circles onto the scallops, then we glued the top of the stocking. Next we sewed on the loop inside the stocking. Lastly we glued the two sides of the stocking together! Simple as that! If you want to sew it rather than glue it, that would work too, but my sewing machine was on the fritz. 
Happy stocking-making!